
Farm Weapon Parts by completing worthwhile secondary objectives, joining manageable invasions with other squads, and successfully extracting. At least one member of your own squad must leave alive to retain the parts collected during the mission. A run with fewer pickups and a successful exit can be more productive than a high-risk route that ends with no retained parts.
Regular Siege is a sensible starting format when you want room for optional activities. Blitz is useful for shorter sessions, while Horde commits you to a ten-wave defense. There is no verified current parts-per-hour winner or guaranteed fixed payout. Launch tuning reduced invasion participation and Weapon Part Stockpile rewards, increased invasion difficulty, and raised equipment and Squad Perk costs, so beta farming totals are outdated targets.
Separate Weapon Parts from the resources spent during a run
Weapon Parts fund permanent weapon customization. Energy supports the current mission through equipment, weapons, and Squad Perk upgrades. Squad Perks are shared in-session buffs that expire when the mission ends. These are different systems, so a large Energy total is not the same outcome as a larger permanent Weapon Part balance.
| Resource | Main purpose | Farming implication |
|---|---|---|
| Weapon Parts | Purchase unlocked Weapon Mods | Collect them and finish extraction to retain mission earnings |
| Energy | Buy equipment, weapons, and Squad Perk upgrades during the mission | Spend it where it improves completion chances |
| Squad Perks | Temporary squad benefits | Use them to support the route rather than expect permanent unlocks |
| Class XP | Class progression | Unlock options needed for the weapon purchases you plan |
Weapon Mods first need the relevant class unlock and then a Weapon Part purchase before they can be equipped. Collecting parts cannot substitute for an unavailable progression unlock. Decide what you want to buy before the run so the farming goal is concrete.
Horde weapon customization carries between classes using that weapon. Improving a rifle you expect to equip on several classes can be useful, but check each class's access before spending. You do not need to assume every new role immediately offers the same loadout.
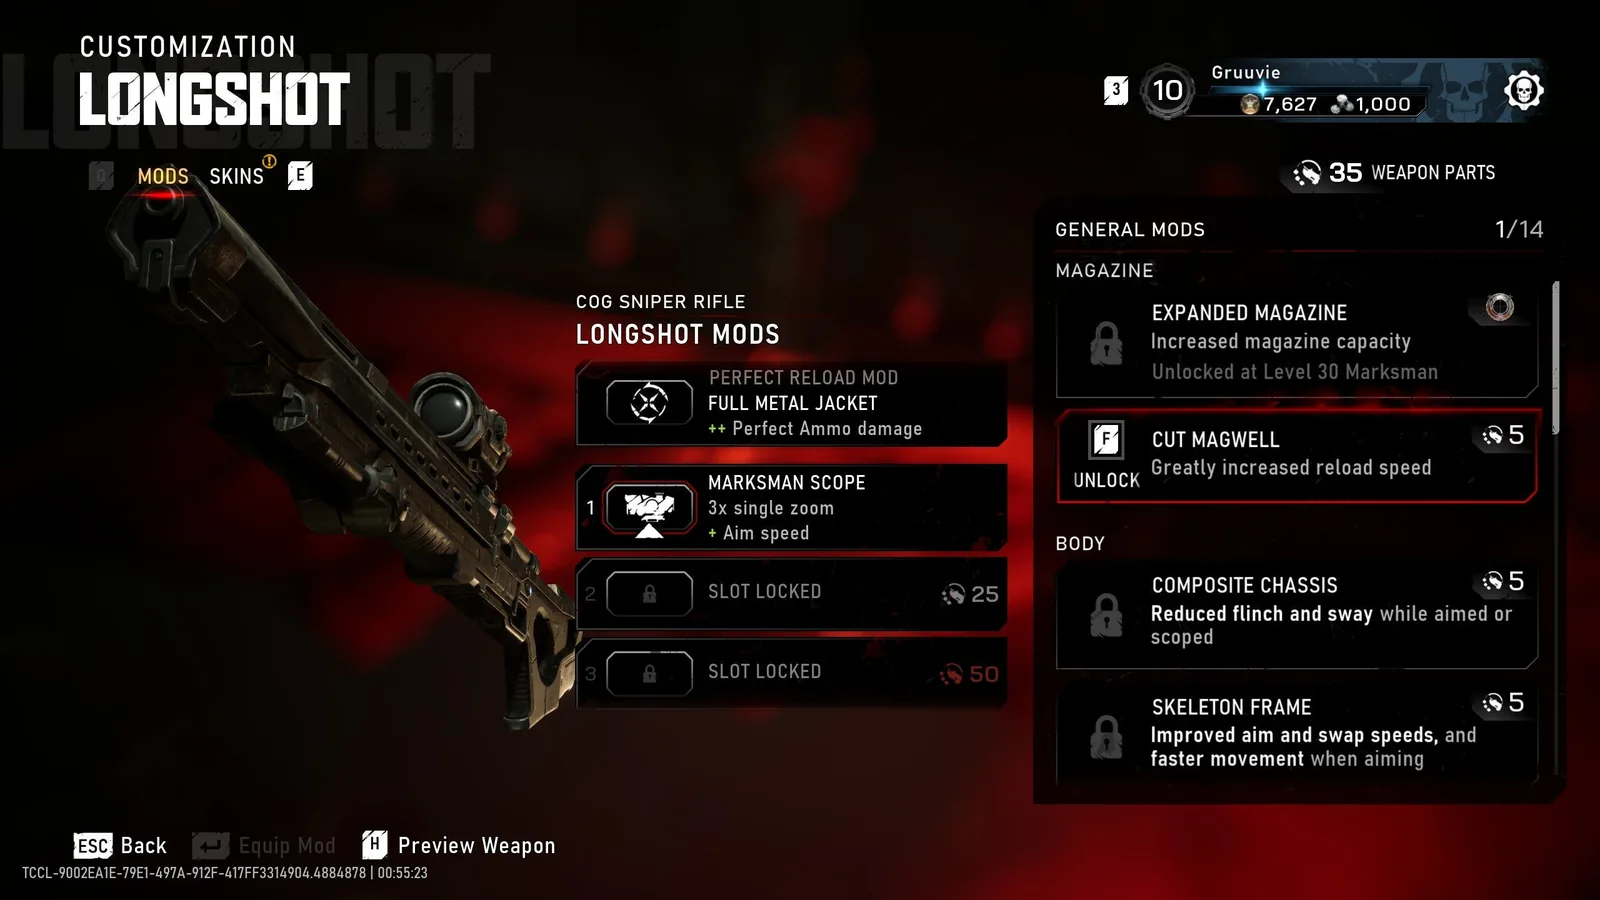
Weapon Parts appear beside permanent weapon customization options, separate from the resources spent during a mission.
Pick the playlist around your available time and completion rate
Blitz contains one or two objectives and is usually described as roughly 15–20 minutes. Siege offers a standard mission with more movement and objectives, roughly 20–40 minutes. Horde asks you to defend one R.I.G. through ten waves and can last 50–60 minutes. These are format expectations rather than promises about your run's actual duration.
| Playlist | Reason to use it | Main farming tradeoff |
|---|---|---|
| Blitz | Fit a run into a shorter session | Less time and opportunity for detours |
| Siege | Mix main progress with optional activities | Travel and event choices can extend the run |
| Horde | Prepare for a longer defensive session | A late failure can waste more time |
Begin with a format you can finish reliably. If your squad regularly runs out of time during Horde, shorter completed missions may suit the farming session better. If you complete Siege comfortably and can handle nearby side objectives, its extra opportunities may be useful.
Do not choose a playlist solely because an older video promises a fixed number of parts. Encounter availability, difficulty, optional objectives, and extraction all affect the result. Measure the parts you actually retain across comparable completed runs before calling one route faster.
Set a difficulty the selected classes can support
Higher difficulties offer increased rewards, but they also raise the chance that a detour becomes a failed mission. Official recommendations place Infantry around class levels 10–20, Commander around 20–30, and Allfather at max-level classes. Your squad's execution and current unlocks still matter within those recommendations.
Launch tuning increased Commander and Allfather difficulty and made invasions harder. A beta route that depended on easily clearing both a main objective and a boss event cannot be copied without reassessing the risks. More expected rewards do not help if the group repeatedly fails before extraction.
For farming, prioritize a difficulty where the squad can complete objectives without spending the whole run recovering from downs. Raise it when you have a reliable baseline and can compare the retained payout against the additional time and failures. Avoid changing playlist, difficulty, classes, and route all at once; that makes it difficult to tell which choice improved the outcome.
Choose secondary objectives by distance and required tools
Secondary objectives offer bonus rewards such as Weapon Parts, equipment, and Squad Perks. They include tasks like eliminating a high-value target, collecting COG intel, defusing explosives, or delivering a Power Core to another squad's R.I.G. Their value comes from the reward and from how safely your group can complete them along its current route.
Before accepting a task, check three things: where it is, what the task requires, and whether the squad is ready. A nearby task with the correct equipment can be useful. A marker across several contested streets is not automatically worth the travel simply because it awards parts.
Explosive tasks and emergence holes
Community routes often favor emergence-hole objectives when a squad has the Gut-Puncher or other explosive tools. The practical advantage is that the weapon answers the objective directly. It is not a verified universal completion time or proof that the Medic must be the farmer in every group.
Confirm the equipped ammunition can close the hole, and assign teammates to clear the enemies interfering with the task. An explosive weapon does not make the carrier safe while aiming at the objective. Do not separate one player from the whole group just to shorten the route on paper.
Carried items and high-value targets
A delivery can be worthwhile when the route and receiving R.I.G. are close to the squad's current path. Protect the carrier and keep the destination clear. The total travel and defense requirement matters more than a clip showing only the final interaction.
For a high-value target, check whether nearby players can help and whether the group has appropriate weapons. Starting a difficult enemy fight without ammunition or useful support can turn a short detour into a long recovery. The optional label does not mean the encounter is harmless.
Treat invasions as shared events with a real cost
Invasions bring large Locust enemies and supporting units onto the map. All squads receive the event notification, and temporary modifiers can affect everyone, including blocking extraction or disabling Supply Caches. Squads that join the fight receive a portion of the rewards.
Join when the squad can contribute and survive with the other groups. Coordinate instead of sending one player to the boss while everyone else starts a different task. A shared event is most useful when the squads combine enough firepower and objective attention to finish it.
Launch tuning reduced Weapon Part rewards for participation and increased invasion difficulty. Do not assume waiting for an invasion is always the best farming strategy. Compare the event's actual time, the squad's readiness, and the effect on the main mission.
If an invasion blocks extraction, the group may have to resolve the event before leaving. Read the current mission state instead of mistaking the modifier for a guaranteed helicopter fault. Farming plans should leave enough resources to deal with a late event, rather than spend everything on an earlier optional fight.
Read the COG Resupply type before making the detour
COG Resupplies appear as free opportunities, but their types have different rewards. Supply Drops contain equipment and modded weapons. Perk Caches provide Squad Perks. Weapon Part Stockpiles reward parts and require coordination with other squads. A free pickup marker therefore does not always represent the permanent resource you came to farm.
All resupplies attract Locust forces. Check where your squad is and how the pickup area can be defended before approaching. A stockpile surrounded by enemy pressure can carry more risk than its map icon suggests.
The launch reward reduction applies specifically to Weapon Part Stockpiles. Use the displayed current opportunity and the group's ability to coordinate, rather than an old fixed payout. If the other squads are busy and yours is struggling to reach the main objective, pursuing the stockpile may not be the best use of the run.
Spend Energy to preserve the farming route
Energy is collected as a shared squad pool, while spending is individualized. At Supply Caches, your options reflect class and progression. Use those options to solve the next objective's need: defense, explosives, a suitable weapon, or a useful Squad Perk upgrade.
Check current prices. Equipment and Squad Perk costs increased for launch, and some perk impacts were reduced. A beta shopping list can leave the group short of what it needs for the final encounter. Buy for the mission's actual problem instead of upgrading every available choice automatically.
Equipment and grenades occupy the same inventory slot. Verify your carried item after a purchase, especially when you are the player assigned to an explosive objective. Replacing a grenade with a defense tool changes which tasks you can immediately perform.
Use nearby supplies when they are safely available, but do not turn ammunition savings into an unsafe solo trip. Leaving the group during a dangerous defense can cost more than the resources you intended to preserve. Completion remains the purpose of every spending decision.
Finish the farming route before the final exit pressure
Choose optional tasks while you still have time to regroup and prepare. Main-objective completion leads into extraction, so do not assume you can finish the last primary task and then freely explore every remaining marker. Agree on the last worthwhile detour before committing to the final objective.
- Check the squad's current ammunition, surviving players, and support readiness.
- Choose one nearby optional task that the group can complete safely.
- Finish it together and confirm the reward or objective state.
- Return to the main route and prepare equipment for the final fight.
- Complete the primary objective and move together toward extraction.
A useful stop rule is practical rather than numerical: stop detouring when the squad is struggling to recover, the next task requires tools you do not have, or the group no longer has time for a safe exit. The reward already collected is still conditional on completion.
Make boarding the Raven part of the farming task
Extraction asks the squad to clear the landing zone and survive until the Raven arrives. At least one member of your own squad must board successfully to complete the mission. Players from a different squad extracting do not satisfy that requirement for yours.
Protect the standing players, use nearby cover, and leave when the boarding opportunity appears. Do not remain outside chasing a final kill or an unrelated pickup while the ride is available. The parts count only helps permanent progression after the squad completes the exit.
A total squad wipe costs a Squad Life. Consuming all lives fails the mission and returns the group to the lobby with partial XP. Partial XP does not mean collected mission Weapon Parts were retained. Keep those outcomes separate when reviewing a failed route.
Compare retained results instead of claimed maximums
Record the selected playlist, difficulty, elapsed session time, successful extraction, and the actual parts retained. Include failed runs in the time cost. A route that produces a high successful payout but fails regularly may be less useful than a modest route your group completes consistently.
Do not label a personal sequence the fastest possible route after one favorable event. Check several comparable runs and note whether the same opportunities appeared. Keep the next purchase in view: once you can buy the mod your loadout needs, spend deliberately and reassess whether further farming is solving a current problem.